
Repairing chipped paint on kitchen cabinets is a simple, cost-effective way to give your kitchen a fresh, updated look.
In this article, we will discuss the importance of repairing chipped paint, the reasons why paint chips, how to choose the right paint color and sheen, types of damage on kitchen cabinets, and the materials and tools required for the repair.
- Why Repairing Chipped Paint on Kitchen Cabinets Matters
- Common Causes of Chipped Paint on Kitchen Cabinets
- Choosing the Right Color and Paint Sheen
- Types of Damage on Kitchen Cabinets
- Materials and Tools Required for Repairing Chipped Paint
- Step-by-Step Process for Repairing Chipped Paint on Kitchen Cabinets
- Repairing Peeling Veneer
- Fixing Chips and Scratches with Touch-up Paint
- Repairing Deeper Chips in Cabinet Facades
- Conclusion
Why Repairing Chipped Paint on Kitchen Cabinets Matters
DIY repairing chipped paint on kitchen cabinets is essential for maintaining a clean, polished appearance in your home. Chipped paint can be unsightly, making your kitchen appear older and unkempt. Additionally, addressing paint chips promptly can help prevent further damage to the cabinets, such as moisture penetration, which can lead to swelling and warping.
Common Causes of Chipped Paint on Kitchen Cabinets
Chipped paint on cabinets can occur for various reasons, including:
- Poor surface preparation during the initial painting process
- Low-quality paint or paint that’s too thin
- Frequent contact with water or humidity
- General wear and tear from daily use
Understanding the root cause of the chipping will help ensure your repairs are long-lasting.
Choosing the Right Color and Paint Sheen
Finding the perfect paint color match
To achieve a seamless repair, it’s crucial to find an exact color match for your kitchen cabinets. Here are some tips to help you find the perfect paint color match:
- Use paint chips from the original paint job or the store where it was purchased
- Consult the previous owner or store for the exact paint color and brand used
- If all else fails, take a sample of the chipped paint to a paint store for a custom color match
Selecting the appropriate paint sheen
Choosing the right paint sheen is crucial for achieving a consistent, professional finish. Common paint sheens for kitchen cabinets include:
- High-gloss: Offers a shiny, reflective finish, which is easy to clean and durable
- Semi-gloss: Provides a subtle shine and is also relatively easy to clean
- Satin finish: Has a soft, smooth appearance and offers some washability
- Matte finish: Delivers a flat, non-reflective finish that can hide minor imperfections
Types of Damage on Kitchen Cabinets
Chips
Chips are small, localized areas where the paint has come off, exposing the underlying surface. Repairing chipped paint on kitchen cabinets involves sanding, filling (if necessary), priming, and painting.
Scratches
Scratches are linear marks or grooves caused by sharp objects. Repairing scratches may require a similar process to fixing chips, depending on the scratch’s depth and severity.
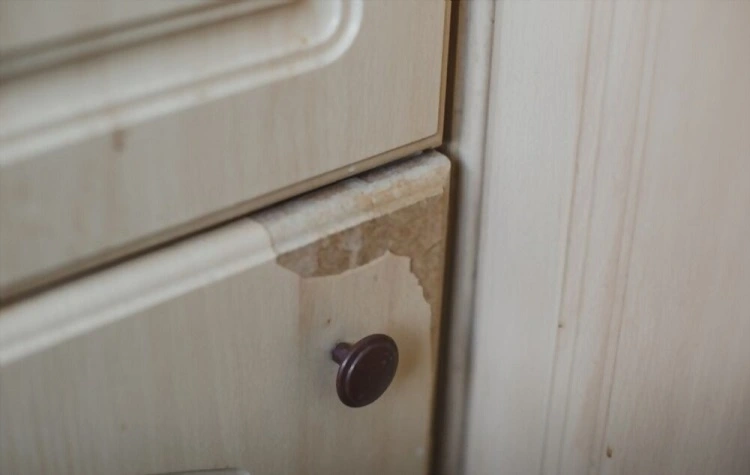
Peeling veneer
Peeling veneer occurs when the thin layer of wood or laminate on the cabinet surface begins to lift. Repairing peeling veneer may involve re-gluing, patching, or replacing the affected area.
Materials and Tools Required for Repairing Chipped Paint
Essential materials
To repair chipped paint on kitchen cabinets, you will need the following materials:
- Sandpaper (240-320 grit)
- Cleaner (mix dish soap and water)
- Towel
- Wood filler (if required)
- Primer (if required)
- Paint
- Paintbrush (small brush)
- Screwdriver (for unscrewing knobs or handles)
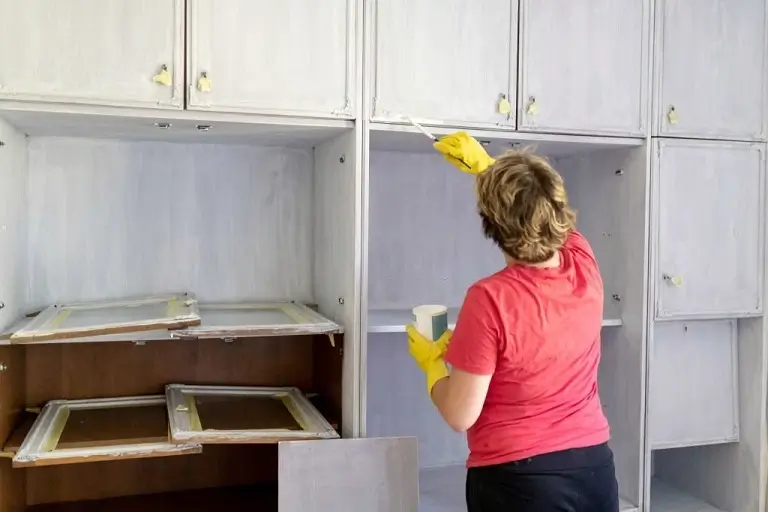
Step-by-Step Process for Repairing Chipped Paint on Kitchen Cabinets
Follow this step-by-step guide to repair chipped paint on your kitchen cabinets with ease:
Preparing the cabinets
- Remove handles or knobs: Using a screwdriver, carefully remove any handles or knobs from the affected cabinets to avoid damaging them during the repair process.
- Clean chipped areas with soap solution: Mix dish soap and water to create a cleaning solution, then use a towel to gently clean the chipped areas, removing any dirt or grease.
- Sand the chipped areas lightly: Using 240-320 grit sandpaper, gently sand the chipped areas to remove any loose paint and create a smooth surface for the new paint to adhere to.
- Fill deep chips with wood filler (if necessary): If there are any deep chips or gouges, apply wood filler to the affected areas and let it dry according to the manufacturer’s instructions.
- Sand and clean wood-filled areas: Once the wood filler has dried, sand it down until it’s flush with the surrounding surface. Clean any dust or debris with a damp towel.
Painting the chipped kitchen cabinets
- Apply primer (if required): If the chipped area exposes bare wood or the damage is extensive, apply a thin layer of primer to ensure proper paint adhesion.
- Apply paint in thin layers: Using a small paintbrush, apply a thin coat of paint over the chipped area, being careful to avoid drips or brush marks.
- Blend the paint with the existing color: While the paint is still wet, gently feather the edges to blend it with the surrounding paint, creating a seamless finish.
- Check for perfect blending and apply additional coats if needed: Allow the paint to dry and evaluate the repair. If necessary, apply additional coats of paint until the chipped area is no longer visible.
Repairing Peeling Veneer
Necessary tools and materials
- Plastic straw, nail file, or paper clip: To lift the veneer and remove debris
- Clamp: To secure the veneer while the glue dries
- Syringe filled with glue: For precise application of wood glue
- Small piece of sandpaper: To smooth any rough edges
Step-by-step repair process
- Clean the space beneath the peeling veneer: Use a plastic straw, nail file, or paper clip to lift the veneer gently and clean out any dust or debris beneath it.
- Remove dust and debris: Wipe the area with a damp cloth to remove any remaining dust or debris.
- Apply wood glue using a syringe: Fill a syringe with wood glue and carefully apply it beneath the peeling veneer, ensuring even coverage.
- Clamp the veneer to the cabinet: Position the veneer back in place and use a clamp to hold it securely against the cabinet until the glue dries.
- Protect the surface and let the glue dry: Follow the manufacturer’s recommendations for drying time, then gently remove the clamp and use sandpaper to smooth any rough edges.
Fixing Chips and Scratches with Touch-up Paint
Touch-up paint is a quick and easy solution for minor chips and scratches on your kitchen cabinets. Here’s how to determine when touch-up paint is appropriate and how to apply it correctly:
Identifying when touch-up paint is appropriate
Touch-up paint is best suited for small, shallow chips and scratches that don’t require extensive repair work. It is ideal for minor damage caused by daily wear and tear or light impact.
Finding the right paint color
To find the right paint color, refer to the original paint can or consult the cabinet manufacturer for a color code or paint match recommendation. Alternatively, you can bring a small sample or chip of the existing paint to a paint store for a custom color match.
Applying the touch-up paint
Follow these steps to apply touch-up paint to chips and scratches:
- Dab paint from the center of the chip to the edges: Using a small paintbrush, apply a small amount of paint to the center of the chip, then gently spread it outwards towards the edges.
- Brush the edges to blend the paint: Lightly brush the paint’s edges to blend it seamlessly with the surrounding cabinet finish.
- Remove excess paint with a dry cloth: If any paint has spread beyond the chipped area, carefully wipe it away with a clean, dry cloth.
Repairing Deeper Chips in Cabinet Facades
For deeper chips in cabinet facades, you may need to use a plastic wood filler before applying touch-up paint.
Using plastic wood filler
Follow these steps to repair deeper chips with plastic wood filler:
- Fill the divot or chip with the filler: Carefully apply the plastic wood filler to the chipped area, ensuring it fills the entire divot or chip.
- Allow the filler to dry: Follow the manufacturer’s instructions for drying time.
- Sand the area until smooth and even: Once the filler is dry, sand it down until it’s flush with the surrounding cabinet surface.
Applying cabinet touch-up paint to cover the filler
After repairing the chip with plastic wood filler, follow these steps to apply touch-up paint:
- Match the paint to the cabinet color: Ensure you have the right paint color, as mentioned earlier in the article.
- Blend the repair into the surrounding cabinet: Apply the touch-up paint to the repaired area, blending it with the surrounding cabinet finish, as described in the previous section.
Conclusion
By using touch-up paint and plastic wood filler, you can effectively repair chips and scratches on your kitchen cabinets, restoring their appearance and prolonging their lifespan. With the right techniques and materials, you can confidently tackle these minor repairs and maintain the beauty of your kitchen cabinets for years to come.